本ページにはプロモーションが含まれています。
【HTML】tableタグの使い方、テーブル・表を作る方法を解説

今回は、HTMLのtableタグの使い方について解説していきます。
tableタグは料金表やカレンダーなど、さまざまなところで使用されています。まだ使い方が分からないという方はぜひ使い方をマスターしてみて下さい。
目次
tableタグの基本的な使い方
tableタグの基本的な使い方は以下の通りです。1つづつ見ていきましょう。
tableタグ:テーブル全体を囲うタグ
まずはテーブル全体を囲う<table></table>タグを用意します。
<table>

</table>
trタグ:行を定義するタグ
tableの行を定義するには<tr></tr>タグを使用します。
3行のテーブルを作成したい場合はtrタグを3つ、4行のテーブルを作成したい場合はtrタグを4つ記載します。
<table>
<tr></tr><!-- 1行目-->
<tr></tr><!-- 2行目-->
<tr></tr><!-- 3行目-->
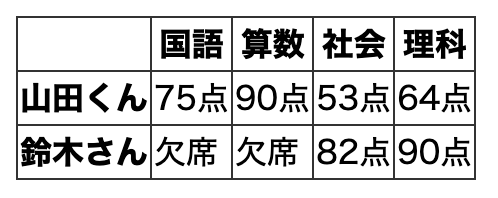
</table>tdタグ:セルを定義するタグ
セルを定義するには<td></td>タグを使用します。
同一行内に5つのセル(列)を追加したい場合はtrタグの中にtdタグを5つ記述します。
<table>
  <tr>
    <td></td>
    <td>国語</td>
    <td>算数</td>
    <td>社会</td>
    <td>理科</td>
  </tr>

  <tr>
    <td>山田くん</td>
    <td>75点</td>
    <td>90点</td>
    <td>53点</td>
    <td>64点</td>
  </tr>

  <tr>
    <td>鈴木さん</td>
    <td>欠席</td>
    <td>欠席</td>
    <td>82点</td>
    <td>90点</td>
  </tr>
</table>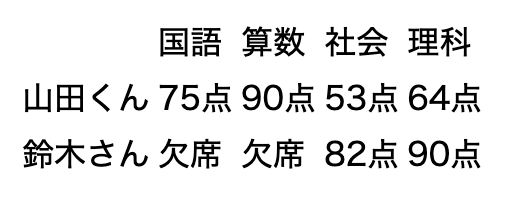
thタグ:見出しセルを定義するタグ
表の見出しにあたる<td></td>タグは<th></th>タグに置き換えることで、表の見出しがどこにあるのかをクローラーに知らせることができます。
今回の表の場合は、1行目の教科名と1列目の人物名がこの表の見出しに該当するので、こちらのtdタグをthタグに置き換えます。
また、scope属性をthタグに記載することで、どの方向に対する見出しセルなのかを明確に示せます。
scope="col"とすると、thタグは下方向に対しての見出しであることを表せ、scope=”row”とすると、右方向に対しての見出しであることを表せます。
<table>
  <tr>
    <th scope="col"></th>
    <th scope="col">国語</th>
    <th scope="col">算数</th>
    <th scope="col">社会</th>
    <th scope="col">理科</th>
  </tr>

  <tr>
    <th scope="row">山田くん</th>
    <td>75点</td>
    <td>90点</td>
    <td>53点</td>
    <td>64点</td>
  </tr>

  <tr>
    <th scope="row">鈴木さん</th>
    <td>欠席</td>
    <td>欠席</td>
    <td>82点</td>
    <td>90点</td>
  </tr>
</table>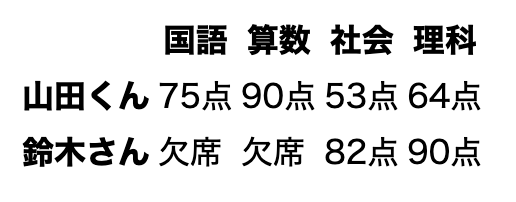
thタグで囲った箇所は見出しセルだと分かるよう、太文字で表示されるようになりました。
thead・tbody・tfoot:テーブルのヘッダー・ボディー・フッターを定義する
テーブルが一通りできたら、各行を<thead></thead>タグ・<tbody></tbody>タグ・<tfoot></tfoot>タグを用いてグループ化しましょう。
- thead・・・テーブルのヘッダー部分を定義する
- tbody・・・テーブルのメイン部分(ヘッダー、フッター以外)を定義する
- tfoot・・・テーブルのフッター部分を定義する
これらは必須タグではありませんが、記載しておくことで各パート毎にスタイル設定がしやすくなります。
<table>
  <thead>
    <tr>
      <th scope="col"></th>
      <th scope="col">国語</th>
      <th scope="col">算数</th>
      <th scope="col">社会</th>
      <th scope="col">理科</th>
    </tr>
  </thead>

  <tbody>
    <tr>
      <th scope="row">山田くん</th>
      <td>75点</td>
      <td>90点</td>
      <td>53点</td>
      <td>64点</td>
    </tr>

    <tr>
      <th scope="row">鈴木さん</th>
      <td>欠席</td>
      <td>欠席</td>
      <td>82点</td>
      <td>90点</td>
    </tr>
  </tbody>
</table>
上の例では、tfootを使用していませんが、テーブルの一番下に点数の平均点をまとめた行などを追加する場合にtfootが用いられます。
テーブルの基本的な使い方は以上です。
テーブルのスタイル設定
デフォルトの状態ではデザインが質素なので、CSSを用いてテーブルに装飾していきましょう。
枠線・セルの境界線をつける
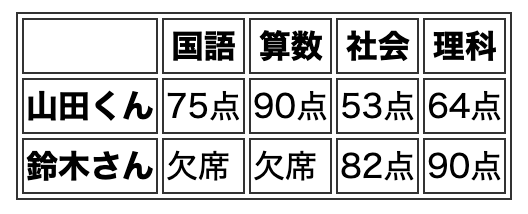
テーブルに枠線・セルの境界線をつけるにはborderプロパティを使用します。
テーブルの外枠はtableタグ、セルの境界線はth・tdタグに対してborderを指定します。
<table>
  <thead>
    <tr>
      <th scope="col"></th>
      <th scope="col">国語</th>
      <th scope="col">算数</th>
      <th scope="col">社会</th>
      <th scope="col">理科</th>
    </tr>
  </thead>

  <tbody>
    <tr>
      <th scope="row">山田くん</th>
      <td>75点</td>
      <td>90点</td>
      <td>53点</td>
      <td>64点</td>
    </tr>

    <tr>
      <th scope="row">鈴木さん</th>
      <td>欠席</td>
      <td>欠席</td>
      <td>82点</td>
      <td>90点</td>
    </tr>
  </tbody>
</table>
table,
th,
td {
border: 1px solid #333;
}
セルが境界線を共有するか分離するかを設定する
デフォルトでは、セルの境界線が分離されているため、各セルの間に隙間が空いています。
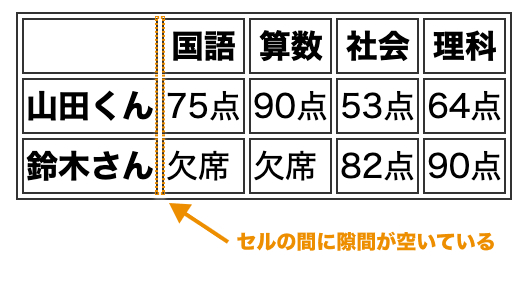
この隙間をセルの境界線が共有されることでなくしたい場合は、border-collapseプロパティを使用します。
<table>
  <thead>
    <tr>
      <th scope="col"></th>
      <th scope="col">国語</th>
      <th scope="col">算数</th>
      <th scope="col">社会</th>
      <th scope="col">理科</th>
    </tr>
  </thead>

  <tbody>
    <tr>
      <th scope="row">山田くん</th>
      <td>75点</td>
      <td>90点</td>
      <td>53点</td>
      <td>64点</td>
    </tr>

    <tr>
      <th scope="row">鈴木さん</th>
      <td>欠席</td>
      <td>欠席</td>
      <td>82点</td>
      <td>90点</td>
    </tr>
  </tbody>
</table>
table,
th,
td {
border: 1px solid #333;
}
table {
border-collapse: collapse;
}
スクロールできます
| border-collapseで指定できる値 | |
|---|---|
| collapse | セルの境界線を共有する |
| separate | セルの境界線を分離する separateにしている場合は、border-spacingで境界同士の間隔を指定できる |
横幅を指定する
テーブルの横幅を指定するには、tableタグに対してwidthを指定します。
<table>
  <thead>
    <tr>
      <th scope="col"></th>
      <th scope="col">国語</th>
      <th scope="col">算数</th>
      <th scope="col">社会</th>
      <th scope="col">理科</th>
    </tr>
  </thead>

  <tbody>
    <tr>
      <th scope="row">山田くん</th>
      <td>75点</td>
      <td>90点</td>
      <td>53点</td>
      <td>64点</td>
    </tr>

    <tr>
      <th scope="row">鈴木さん</th>
      <td>欠席</td>
      <td>欠席</td>
      <td>82点</td>
      <td>90点</td>
    </tr>
  </tbody>
</table>
table,
th,
td {
border: 1px solid #333;
}
table {
width: 1000px;
border-collapse: collapse;
}
列毎に幅を指定したい場合はthあるいはtdに別途横幅を指定する必要があります。
<table>
  <thead>
    <tr>
      <th scope="col"></th>
      <th scope="col">国語</th>
      <th scope="col">算数</th>
      <th scope="col">社会</th>
      <th scope="col">理科</th>
    </tr>
  </thead>

  <tbody>
    <tr>
      <th scope="row">山田くん</th>
      <td>75点</td>
      <td>90点</td>
      <td>53点</td>
      <td>64点</td>
    </tr>

    <tr>
      <th scope="row">鈴木さん</th>
      <td>欠席</td>
      <td>欠席</td>
      <td>82点</td>
      <td>90点</td>
    </tr>
  </tbody>
</table>
table,
th,
td {
border: 1px solid #333;
}
table {
width: 1000px;
border-collapse: collapse;
}
th,td{
width: 20%;
}
上のテーブルではth・tdタグに20%と指定して各セルの幅を均等にしています。
セル内の水平方向の配置を指定する
セル内の水平方向の配置を指定するには、text-alignプロパティを指定します。
thタグはデフォルトで中央寄せにされているので、tdタグのみtext-align: centerで中央寄せにします。
<table>
  <thead>
    <tr>
      <th scope="col"></th>
      <th scope="col">国語</th>
      <th scope="col">算数</th>
      <th scope="col">社会</th>
      <th scope="col">理科</th>
    </tr>
  </thead>

  <tbody>
    <tr>
      <th scope="row">山田くん</th>
      <td>75点</td>
      <td>90点</td>
      <td>53点</td>
      <td>64点</td>
    </tr>

    <tr>
      <th scope="row">鈴木さん</th>
      <td>欠席</td>
      <td>欠席</td>
      <td>82点</td>
      <td>90点</td>
    </tr>
  </tbody>
</table>
table,
th,
td {
border: 1px solid #333;
}
table {
width: 1000px;
border-collapse: collapse;
}
th,td{
width: 20%;
}
td{
text-align: center;
}スクロールできます
| text-alignの主要な値 | |
|---|---|
| left | 要素を左寄せにする |
| center | 要素を中央寄せにする |
| right | 要素を右寄せにする |
垂直方向の配置はvertical-alignプロパティを使用します。
スクロールできます
| vertical-alignの主要な値 | |
|---|---|
| top | 要素を上寄せにする |
| middle | 要素を中央寄せにする |
| bottom | 要素を下寄せにする |
セルのテキスト・背景色を指定する
セルのテキスト・背景色を指定するには、それぞれcolorプロパティ、background-colorプロパティを指定します。
<table>
  <thead>
    <tr>
      <th scope="col"></th>
      <th scope="col">国語</th>
      <th scope="col">算数</th>
      <th scope="col">社会</th>
      <th scope="col">理科</th>
    </tr>
  </thead>

  <tbody>
    <tr>
      <th scope="row">山田くん</th>
      <td>75点</td>
      <td>90点</td>
      <td>53点</td>
      <td>64点</td>
    </tr>

    <tr>
      <th scope="row">鈴木さん</th>
      <td>欠席</td>
      <td>欠席</td>
      <td>82点</td>
      <td>90点</td>
    </tr>
  </tbody>
</table>
table,
th,
td {
border: 1px solid #333;
}
table {
width: 1000px;
border-collapse: collapse;
}
thead th {
background-color: #555555;
color: #ffffff;
}
tbody th {
background-color: #dddddd;
}
th,
td {
width: 20%;
}
td {
text-align: center;
}
tableタグのカスタマイズ方法
tableタグのより細かなカスタマイズ方法は以下の通りです。
セルを結合する
セルを結合するには、thタグあるいはtdタグに水平方向ならcolspan属性を、垂直方向ならrowspan属性を使用します。
colspanとrowspanの値には結合させたいセルの数を記述します。
colspanやrowspanを使ってセルを結合した場合、不要になったタグの削除が必要になります。
<table>
  <thead>
    <tr>
      <th scope="col"></th>
      <th scope="col">国語</th>
      <th scope="col">算数</th>
      <th scope="col">社会</th>
      <th scope="col">理科</th>
    </tr>
  </thead>

  <tbody>
    <tr>
      <th scope="row">山田くん</th>
      <td>75点</td>
      <td>90点</td>
      <td>53点</td>
      <td>64点</td>
    </tr>

    <tr>
      <th scope="row">鈴木さん</th>
      <td colspan="2">欠席</td>
      <!-- <td>欠席</td> --><!-- セルを結合したことで不要になったため削除 -->
      <td>82点</td>
      <td>90点</td>
    </tr>
  </tbody>
</table>
table,
th,
td {
border: 1px solid #333;
}
table {
width: 1000px;
border-collapse: collapse;
}
thead th {
background-color: #555555;
color: #ffffff;
}
tbody th {
background-color: #dddddd;
}
th,
td {
width: 20%;
}
td {
text-align: center;
}
キャプションを付ける
<caption></caption>タグを使用すればテーブルにキャプションを追加することができます。
captionタグはtable開始タグの直後に記載します。
<table>
  <caption>中間試験の結果</caption>
  <thead>
    <tr>
      <th scope="col"></th>
      <th scope="col">国語</th>
      <th scope="col">算数</th>
      <th scope="col">社会</th>
      <th scope="col">理科</th>
    </tr>
  </thead>

  <tbody>
    <tr>
      <th scope="row">山田くん</th>
      <td>75点</td>
      <td>90点</td>
      <td>53点</td>
      <td>64点</td>
    </tr>

    <tr>
      <th scope="row">鈴木さん</th>
      <td colspan="2">欠席</td>
      <td>82点</td>
      <td>90点</td>
    </tr>
  </tbody>
</table>
table,
th,
td {
border: 1px solid #333;
}
table {
width: 1000px;
border-collapse: collapse;
}
thead th {
background-color: #555555;
color: #ffffff;
}
tbody th {
background-color: #dddddd;
}
th,
td {
width: 20%;
}
td {
text-align: center;
}
caption {
font-size: 24px;
text-align: left;
border-left: 5px solid green;
padding-left: 5px;
margin-bottom: 5px;
}
これでテーブルにキャプションが追加されました。
スマホではテーブルを横スクロールできるようにする
テーブルの列数が増えると、スマホ表示の際に文字が改行されて見にくくなります。
そこでスマホではテーブルを横スクロールさせることが可能です。具体的な方法は以下の記事で詳しく解説しているので、こちらもあわせてご覧下さい。
投稿が見つかりません。
まとめ
今回はtableタグの使い方や装飾方法を詳しく解説しました。
tableタグは料金表や会社概要テーブル、カレンダーなどを実装する際によく使用されます。
この機会にしっかり覚えて、tableタグを使いこなせるようになりましょう。
今回は以上になります。最後までご覧頂き、ありがとうございました!